


STUDENT NAME: Jerico M. STUDENT NUMBER: C15580367
Servo Motor
OBJECTIVE: To build a circuit and construct a code to run a servo motor with a dsPIC30F4011 microcontroller.
THEORY: Servo motors are controlled by sending pulses with modulation (PWM) through the control wire. A Servo is a small device that has an output shaft. This shaft can be positioned to precise angular positions by sending the servo a coded signal. As long as the coded signal exists on the input line, the servo will maintain the angular position of the shaft. As the coded signal changes, the angular position of the shaft changes. Servo motors can usually turn 90° in either direction for a total of 180° movement.
EQUIPMENT:
- Servo motor
- Breadboard
- PICkit2
- USB to mini USB cable
- dsPIC30F4011 microcontroller
- 6-pin Header
- 6V power supply
- 220μF capacitor
PROCEDURE: For running the servo motor, the SN754410NE driver wasn’t needed this time since the dsPIC was able to supply the motor with the required current unlike the DC motor. The circuit was very simple since not many connections were needed to be made as the servo motor could just be connected to 6V, ground and a PWM pin in the microcontroller, which can be seen in the wiring diagram below:

After this wiring diagram was connected on the breadboard, a code for the servo motor was constructed:
RESULTS: After making the connections that was shown in the wiring diagram and the code to run the servo motor was made, I ended up with the circuit below:

With this circuit constructed and the code uploaded to the microcontroller, I was able to get a video of the servo motor running.
Stepper Motor
OBJECTIVE: To operate a stepper motor by building a circuit using a dsPIC microcontroller and constructing a code in C++.
THEORY: A stepper motor is a brushless motor which converts electrical pulses into mechanical rotation, which rotates in steps controlled by the input pulses. Stepper motors are usually made up of a number of phases with a toothed rotor which determines the step size of the motor. For this project, we are using a stepper motor with four phases which can be seen in the wiring diagram provided as shown below:

In order to run the stepper motor, each individual phase must be turned on in a sequence for a period of time which can be seen from the timing graph below:

From the wiring diagram and time graph, we can see that the sequence needed to be followed was 1 (blue), 2 (pink), 3 (yellow), 4 (orange), 1, 2, 3, 4, etc…
EQUIPMENT:
- Stepper motor
- Breadboard
- PICkit2
- USB to mini USB cable
- dsPIC30F4011 microcontroller
- SN754410NE quad half H-bridge IC
- 6-pin Header
- 5V power supply
- 220μF capacitor
PROCEDURE: For the microcontroller, the same connections for the DC motor and servo motor were made i.e. Same connections for the PICkit 2 and Vss being connected to ground and Vdd to 5V. The only difference is for this circuit, four outputs were needed since there were four phases in the stepper motor.
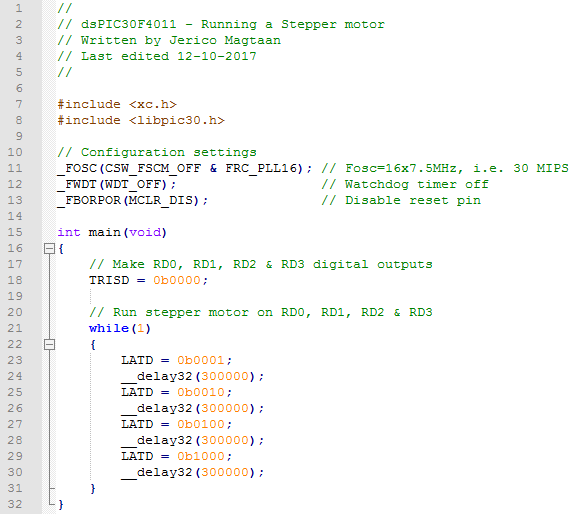
From this wiring diagram, as mentioned before, the sequence 1, 2, 3, 4 had to be followed. This was applied to the code that was constructed in C++ as shown in the code below:
RESULTS: After constructing the code and building the circuit with the sequence required to make the stepper motor run, I ended up with a circuit that looks like this:

One way to know if you haven’t applied the right sequence either with the wiring or the code, the stepper would just vibrate instead of rotating, fortunately my motor started running the first time I tried and got the video below.

Excellent! Very clear presentation.
One small thing: Regarding the use of the word “code”, please take a look at this:
https://robosumo.wordpress.com/2017/11/15/code-is-a-mass-noun/
Ted
LikeLike
Great article. Thanks for sharing the useful information. It’s important to know the difference between a servo motor and a stepper motor. It will save them save a lot of time in selecting between the motors.
LikeLike
nice work on https://okmarts.com/servo-product.html
LikeLike
Thank you for your sharing, useful information!!
LikeLike